Staff Training 101: How to onboard a new receptionist to your PMS in 30 minutes
Friday, 11:40 PM. Six guests walk in off a delayed train, the phone is ringing, and your new receptionist, four days into the job, is staring at a pop-up asking for a "folio routing code". You're already pulling your coat on at home.
Every hotel and hostel manager has a version of this story. Your best receptionist leaves at the end of the season, and you're back to the 40-page manual, the sticky note that says "NEVER click Night Audit twice," and two weeks of shadowing before you can sleep through a weekend shift.
The people will keep changing. Students, seasonal staff, and travellers working for a bed keep most boutique hotels and hostels running. What makes each new hire so expensive is the software. Many legacy property management systems were built decades ago, and learning them means memorizing button sequences, nested menus, and codes that only make sense to whoever set them up.
A modern PMS changes the math. When the screen is clear, fast, and visual, most of the training is already done by the interface. What's left fits into a single 30-minute session.
Here is the framework we use, written by hoteliers for hoteliers.
Pre-training setup (5 minutes before you start)
Before you sit down with your new hire, prepare the system. Five minutes here saves you from a nervous trainee and an accidental change to your rates.
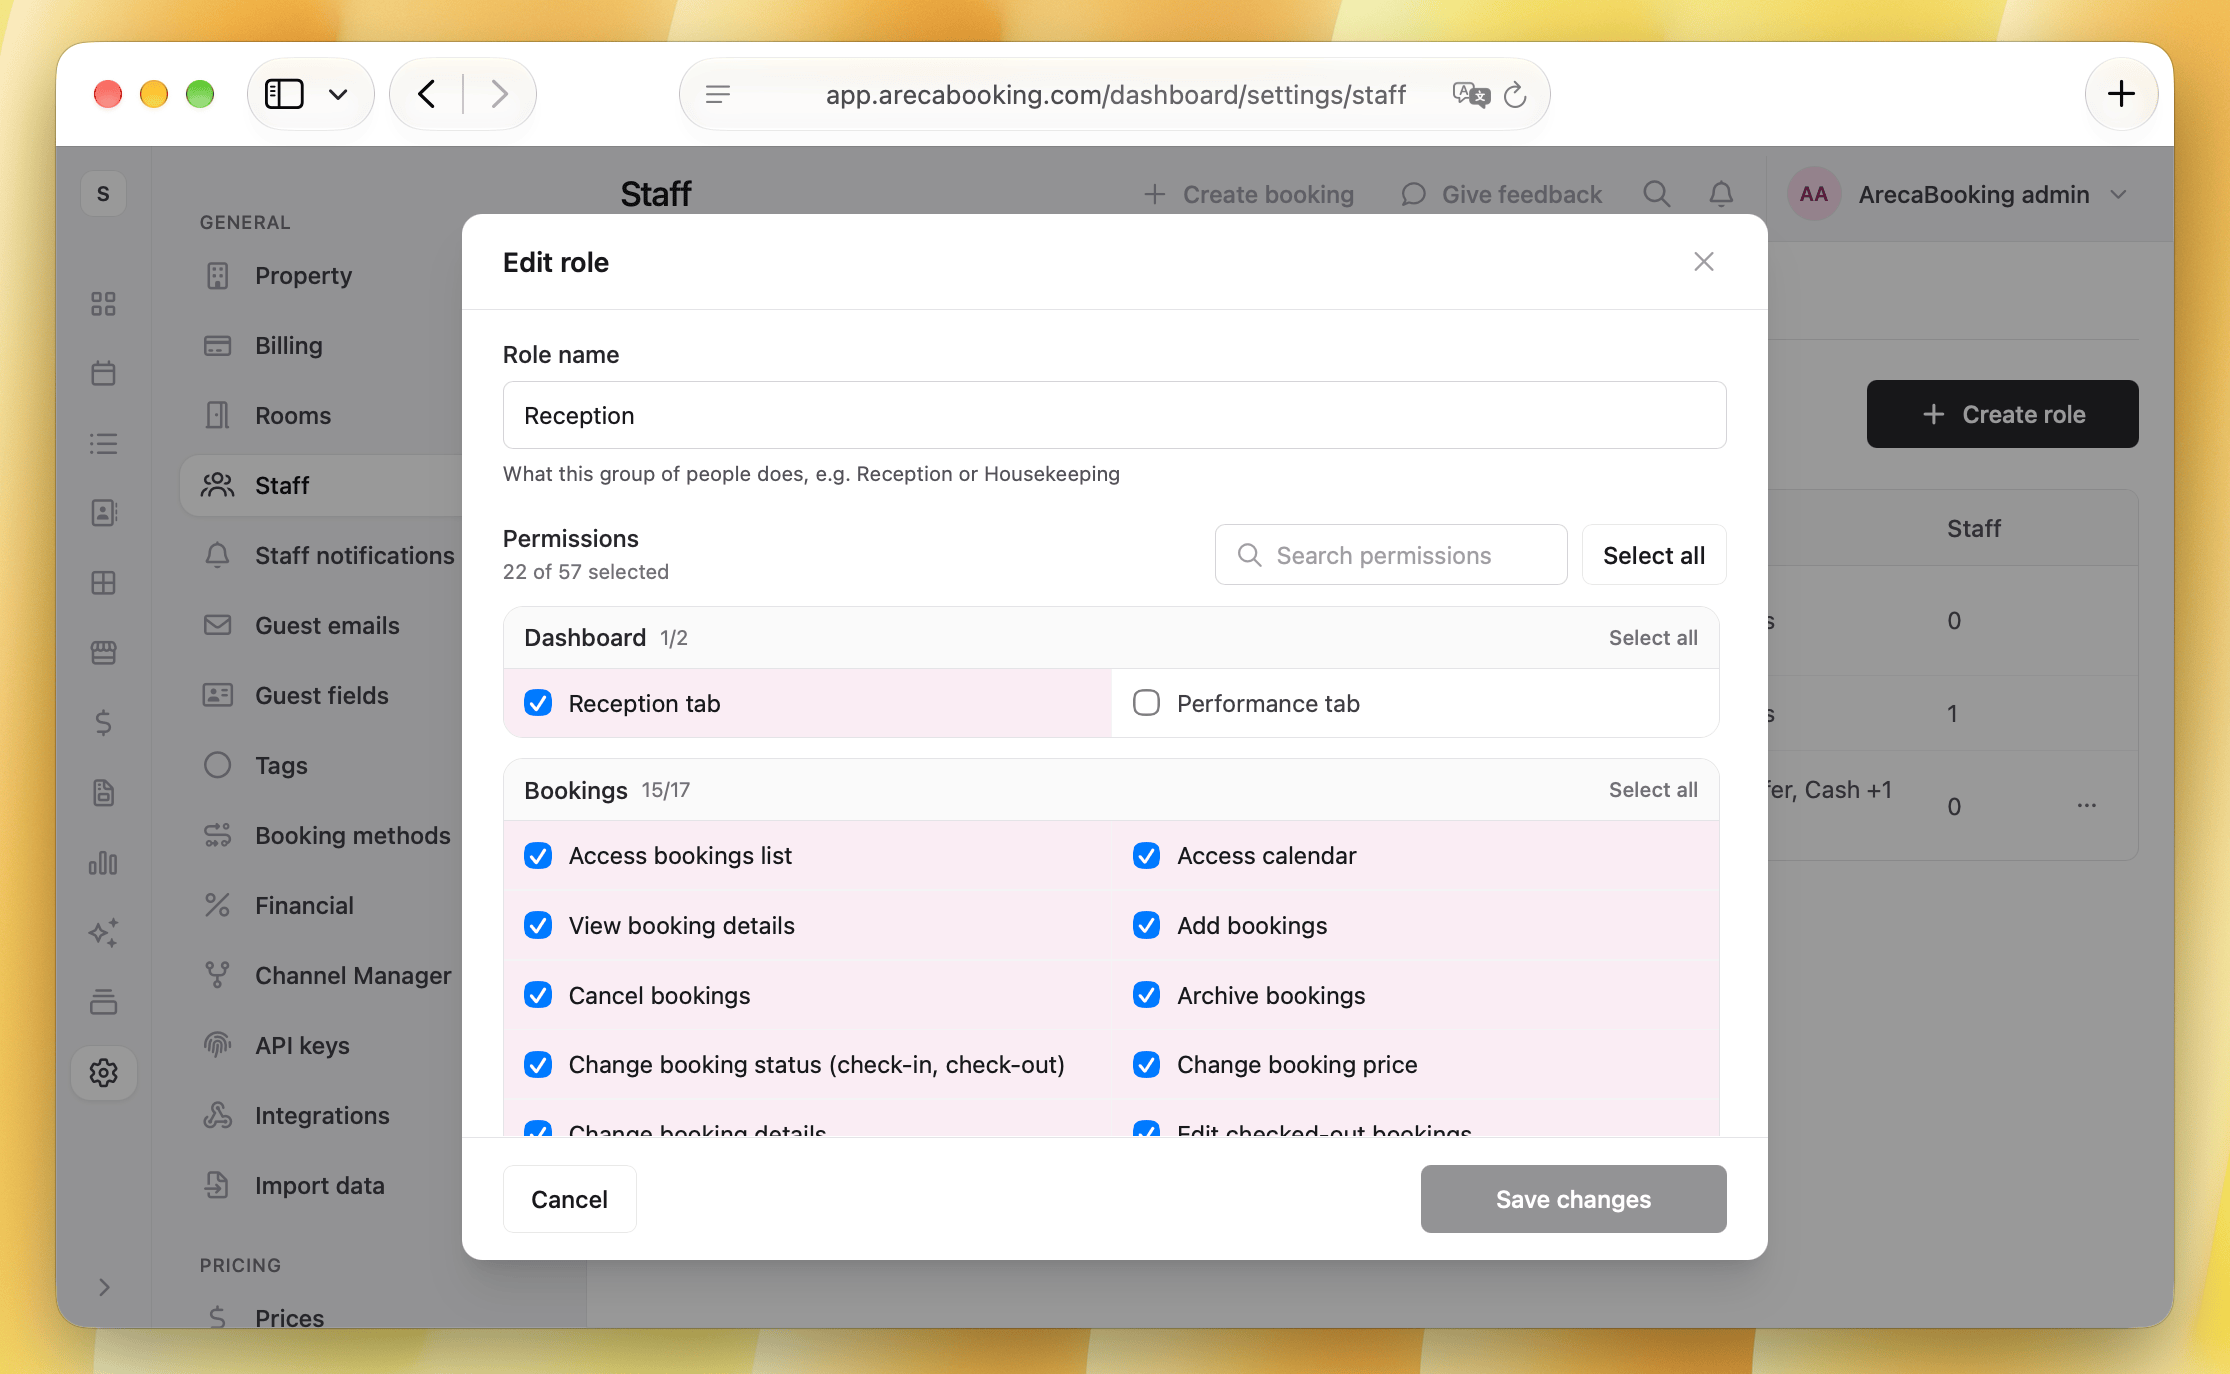
Set up a restricted "Reception" role
New staff don't need to see everything on day one, and they shouldn't. In Areca you can create custom roles with granular permissions, so a "Front Desk / Reception" role can include bookings, check-in, check-out, guest details, and POS, while leaving out:
- Financial settings and reports
- Channel manager connections
- Rate plans and pricing
- Property and room configuration
This does two things. It protects your setup from accidental edits, and it lowers the stress for the new receptionist. A smaller menu is a smaller thing to learn. When they've been with you for a few months, you can widen their access with a couple of clicks.
Give them a safe place to practice
Nobody learns well when every click might send an email to a real guest. Run the first session on a quiet shift, or set up a separate training property in your account with a handful of fake bookings. Let them drag, click, and make mistakes freely. Confidence comes from experimenting, and experimenting needs a space where nothing is at stake.
Tip: Create 5-6 test bookings in advance that match the scenarios below: a standard arrival, a guest who wants to switch rooms, a guest with an unpaid balance, and a late checkout.
In Areca you can create a new property with two units in the free plan (e.g. 2 private rooms, or 1 private room and 4-bed dorm room) and use it as a sandbox for training your receptionist.
The 30-minute training framework
The goal of this session is narrow. By the end, your new receptionist should be able to handle the tasks that make up 90% of a normal shift. Edge cases can wait until week two.
Reading the calendar and finding bookings (Minutes 0-10)
Focus: visual orientation first, data later.
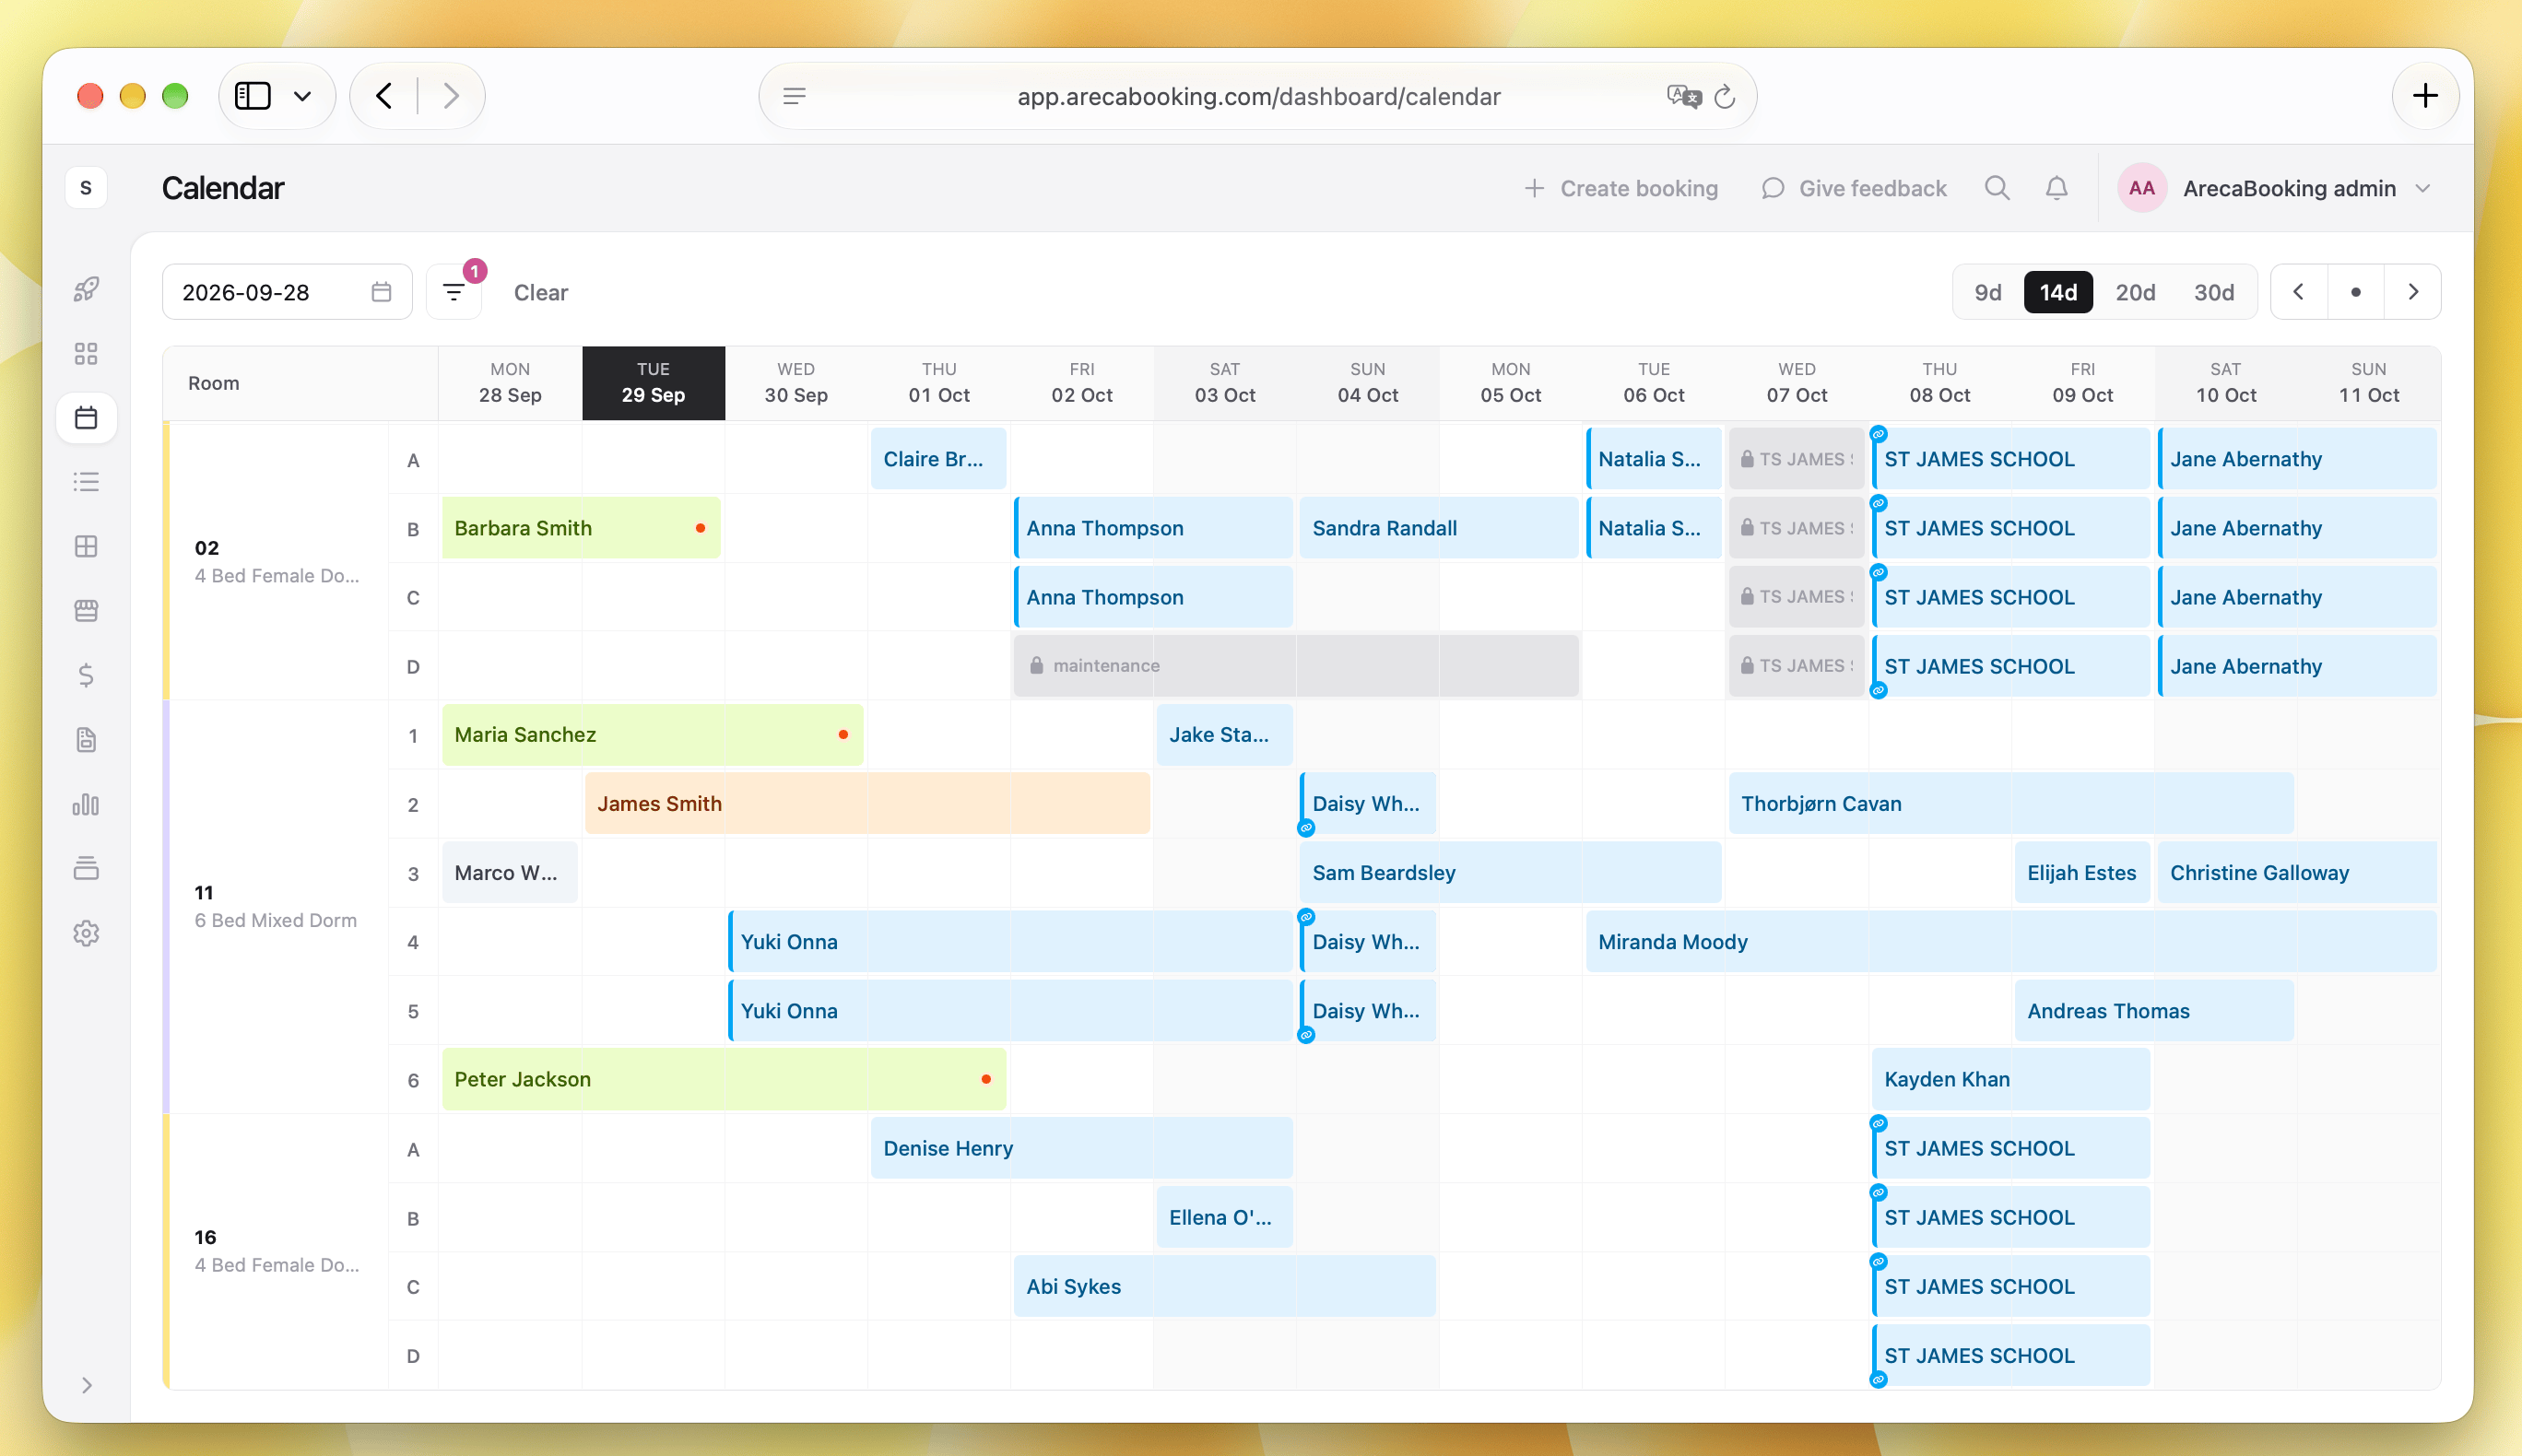
The room calendar is where your front desk team will spend most of their day, so start there. Walk through:
- How to read the grid. Rooms run down the side, dates run across the top. Each colored bar is a booking, and the color tells you its status at a glance: confirmed, arriving, checked in, checked out. Greyed out bars indicate blocked or unavailable rooms.
- Private rooms vs. dorm beds. If you run a hostel or a hybrid property, show how dorm rooms break down into individual beds, so a receptionist can see exactly which bunk is free tonight.
- Finding a booking fast. Show them the search: type a guest's name, reservation code or phone number and jump straight to the booking. No scrolling through dates while a guest waits at the counter.
Areca feature spotlight: speed.
The calendar responds instantly, even when you're scrolling across weeks or a property is fully booked. That matters more in training than people expect. A new receptionist who waits five seconds for every screen to reload starts doubting every click. A system that reacts right away teaches them that it's safe to explore.
Check-ins, room moves, and multi-tasking (Minutes 10-20)
Focus: the three most common daily tasks.
1. The check-in flow
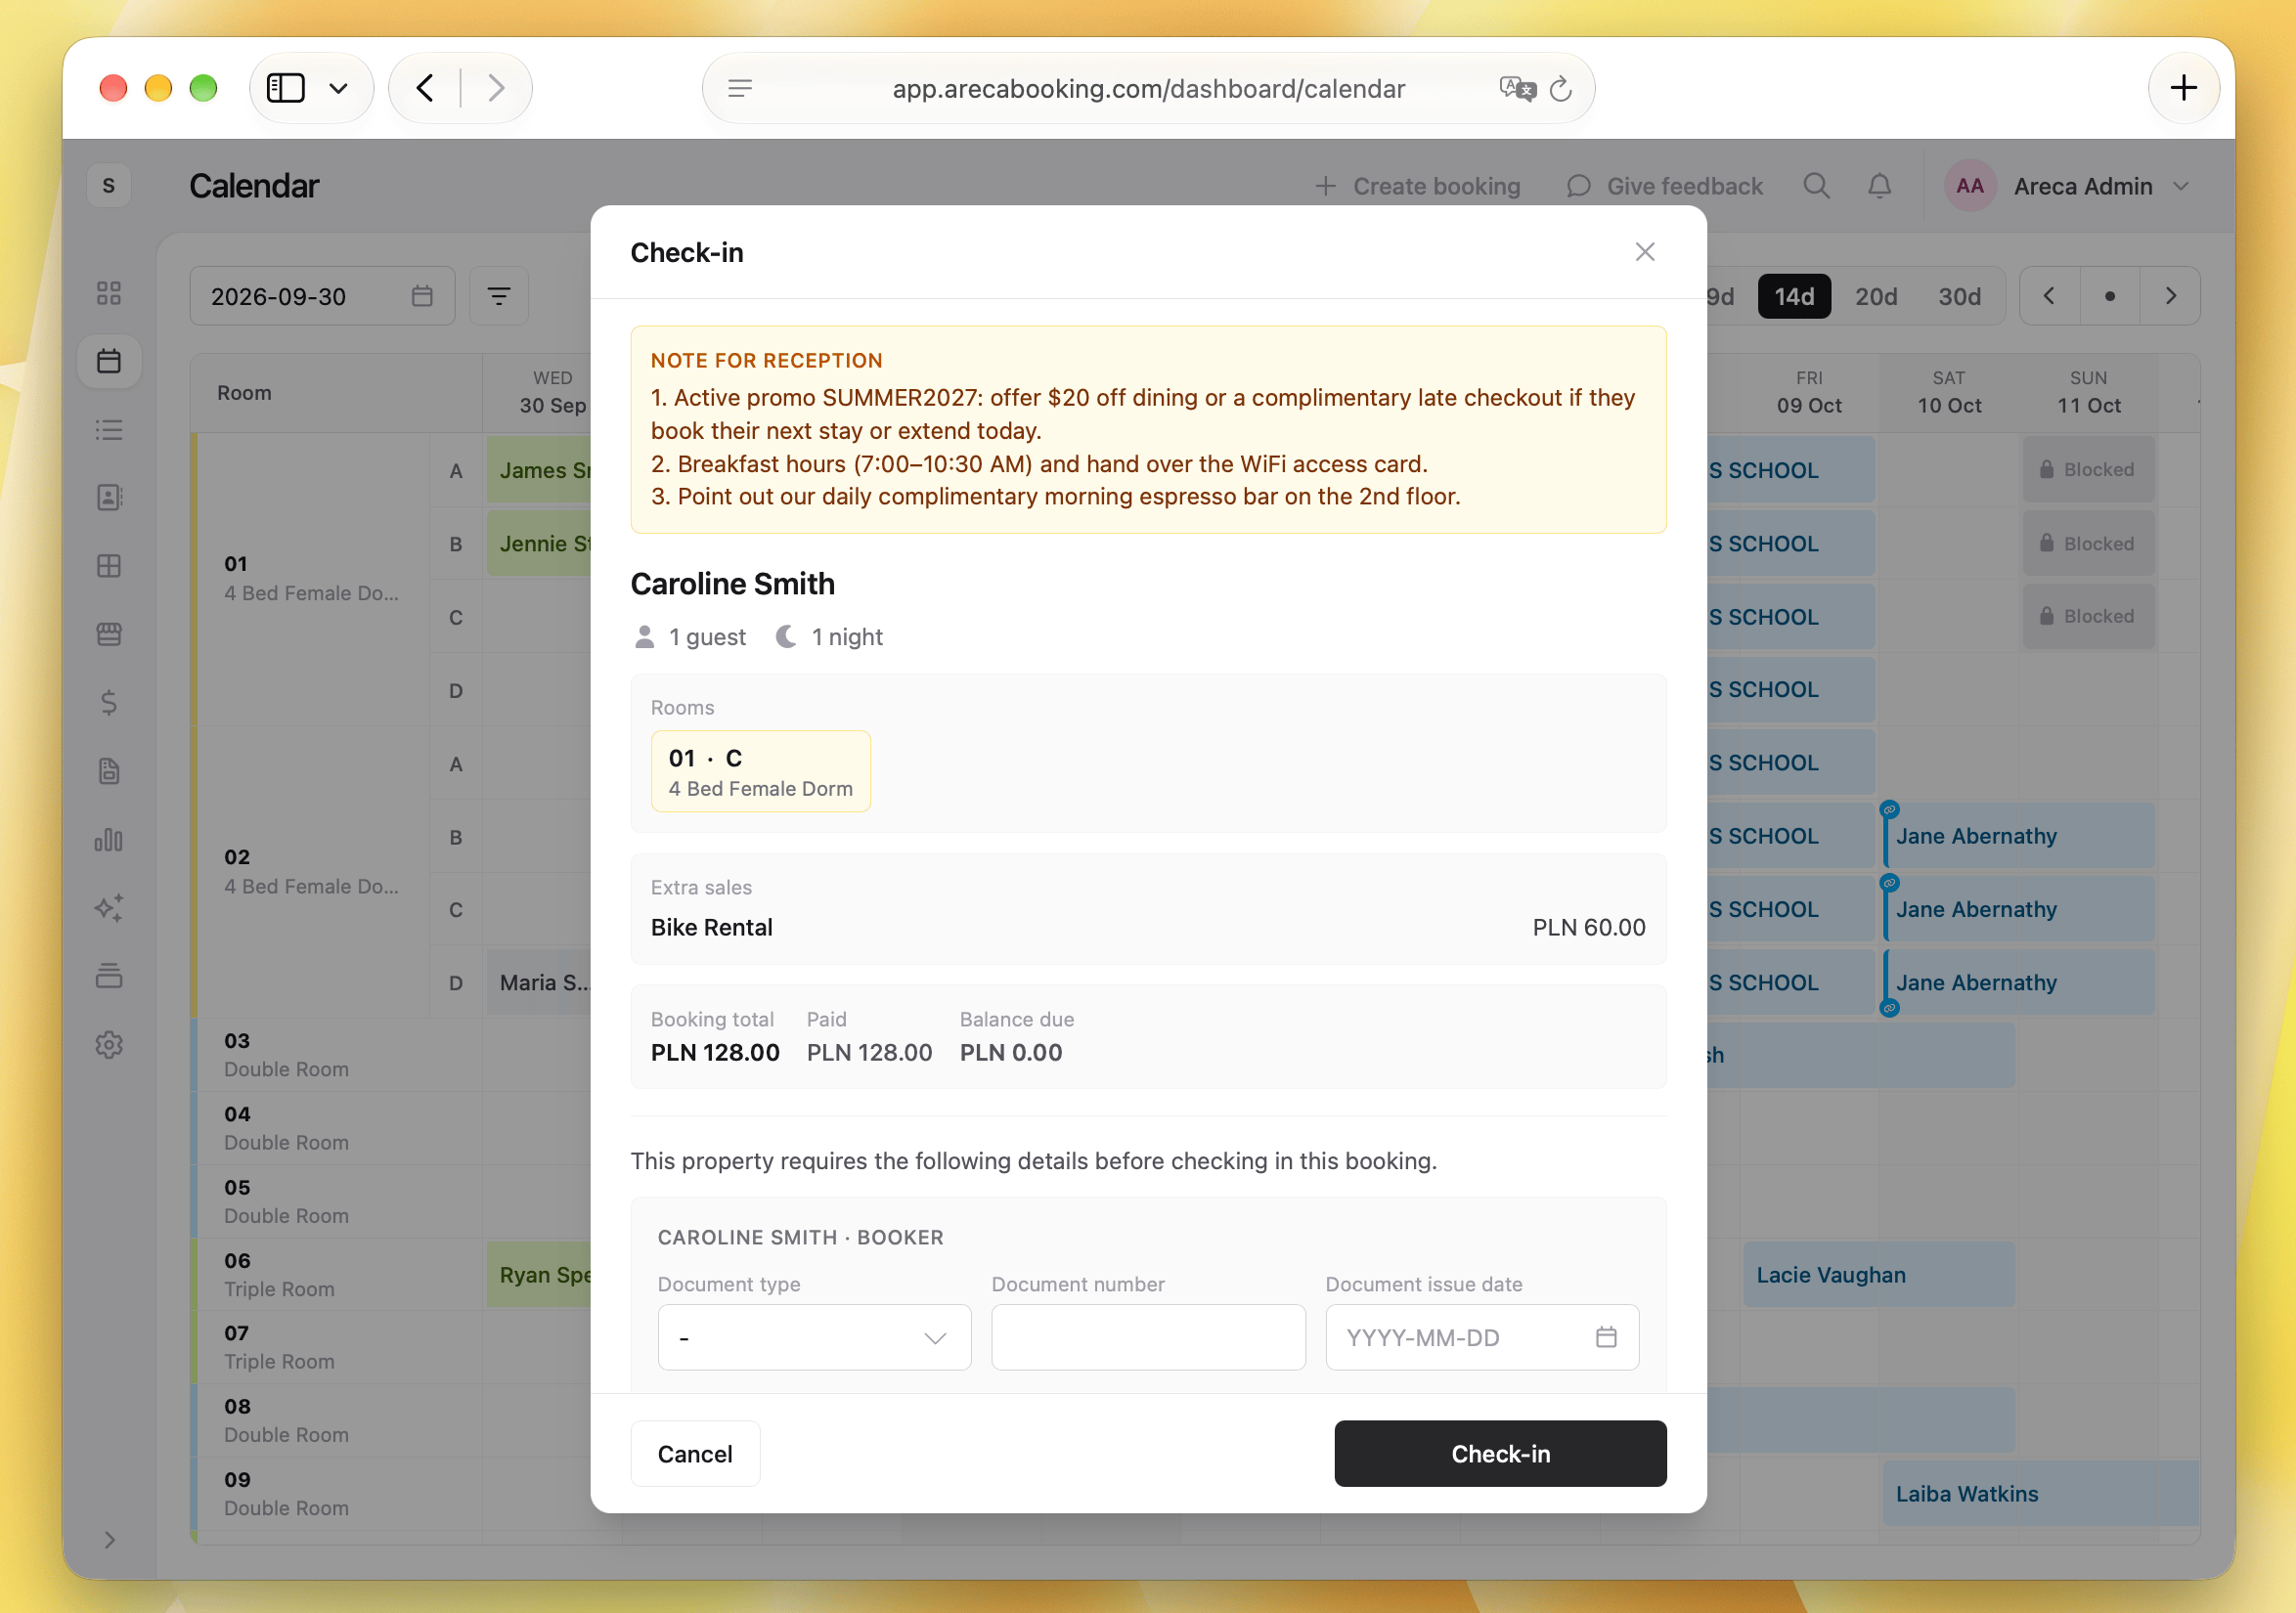
Open a test arrival and walk through it in order:
- Confirm the guest's name, dates, and number of guests
- Fill in or verify ID and passport details for the guest registration
- Check the balance (more on payments in the next block)
- Mark the booking as checked in and hand over the key
Check Arrivals list on the Dashboard to see all upcoming check-ins and quickly access them.
2. Drag-and-drop room moves
A guest asks for a quieter room, or a bathroom leak forces a switch. In older systems that can mean cancelling and rebooking. In Areca, the receptionist grabs the booking on the calendar and drops it into another room. The rate, notes, and payment history stay attached to the reservation.
You can move only part of a booking if needed; hold the Ctrl/Command key while dragging.
3. Multi-tasking without losing your place
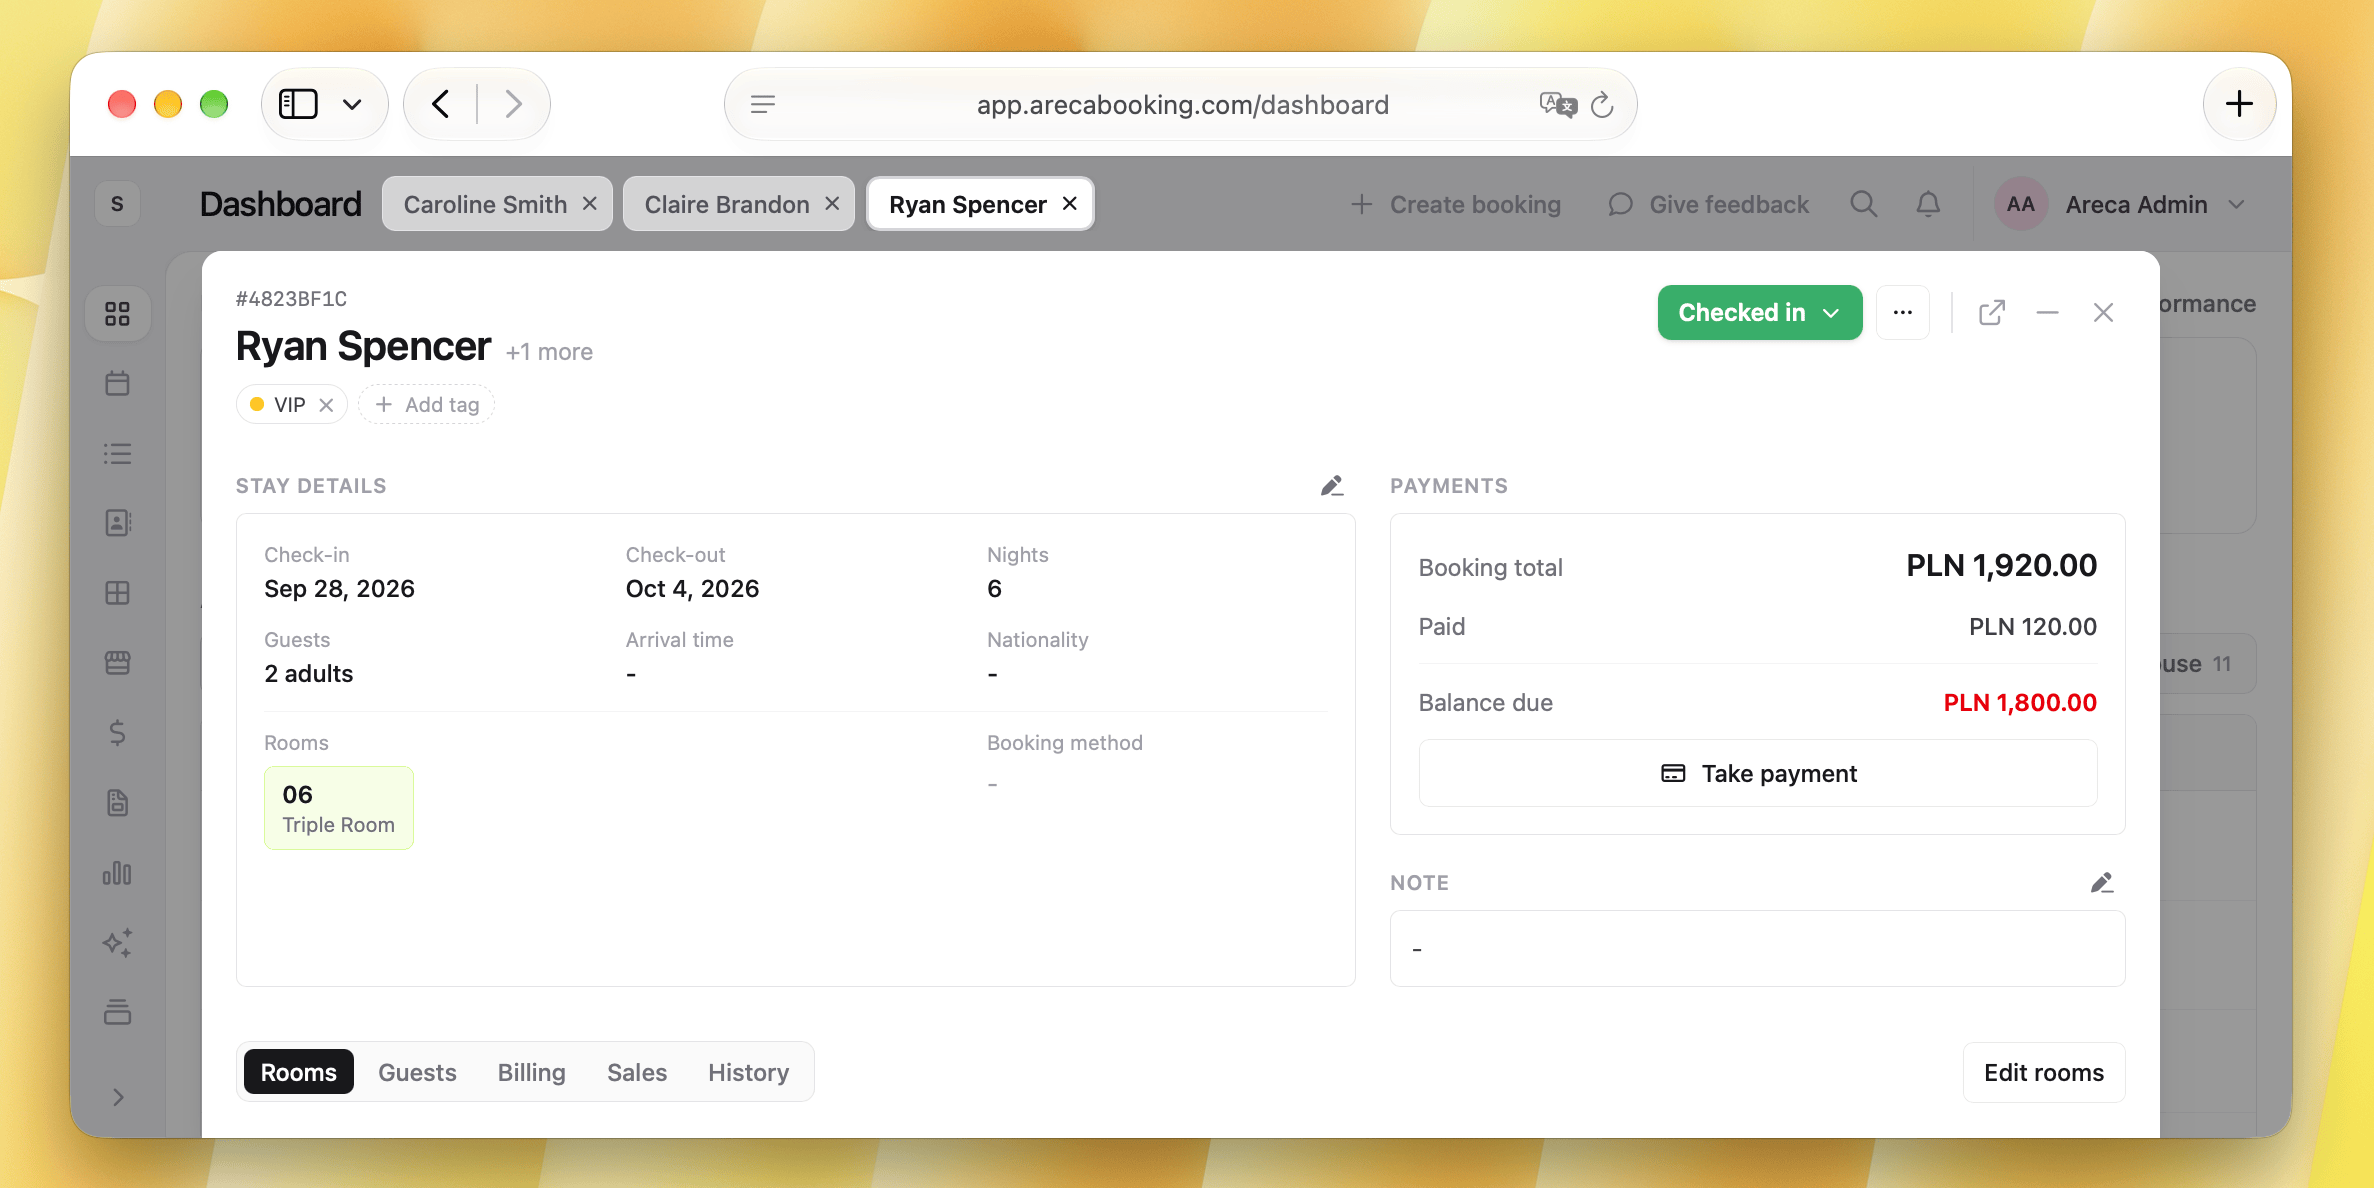
This is the moment that wins new staff over. Picture a check-in rush: a guest is halfway through registration, the phone rings, and another guest at the counter wants to extend their stay. In Areca, the receptionist can minimize the open booking to a tab in the top bar, handle the second request on the calendar, and click back into the first booking exactly where they left it. No half-filled forms lost, no starting over.
Have your trainee practice this once with two test bookings. After one try, it becomes a habit.
Folios, POS, and taking payments (Minutes 20-25)
Focus: handling money without fear.
Payments are where new receptionists are most nervous, so give this block your full attention. Show them:
- The guest folio. Open a booking and show the full picture: room charges, extras, deposits already paid, and the outstanding balance. It's the Billing tab in Areca's interface.
- Adding extras through the POS. Breakfast, a bar tab, laundry, a late checkout fee, a bottle of water at 2 AM. With Areca's integrated POS, the receptionist picks the item and charges it straight to the guest's booking. City tax can be calculated automatically, so nobody has to do the math at the desk.
- Registering a payment. Record a card or cash payment and watch the balance drop to zero.
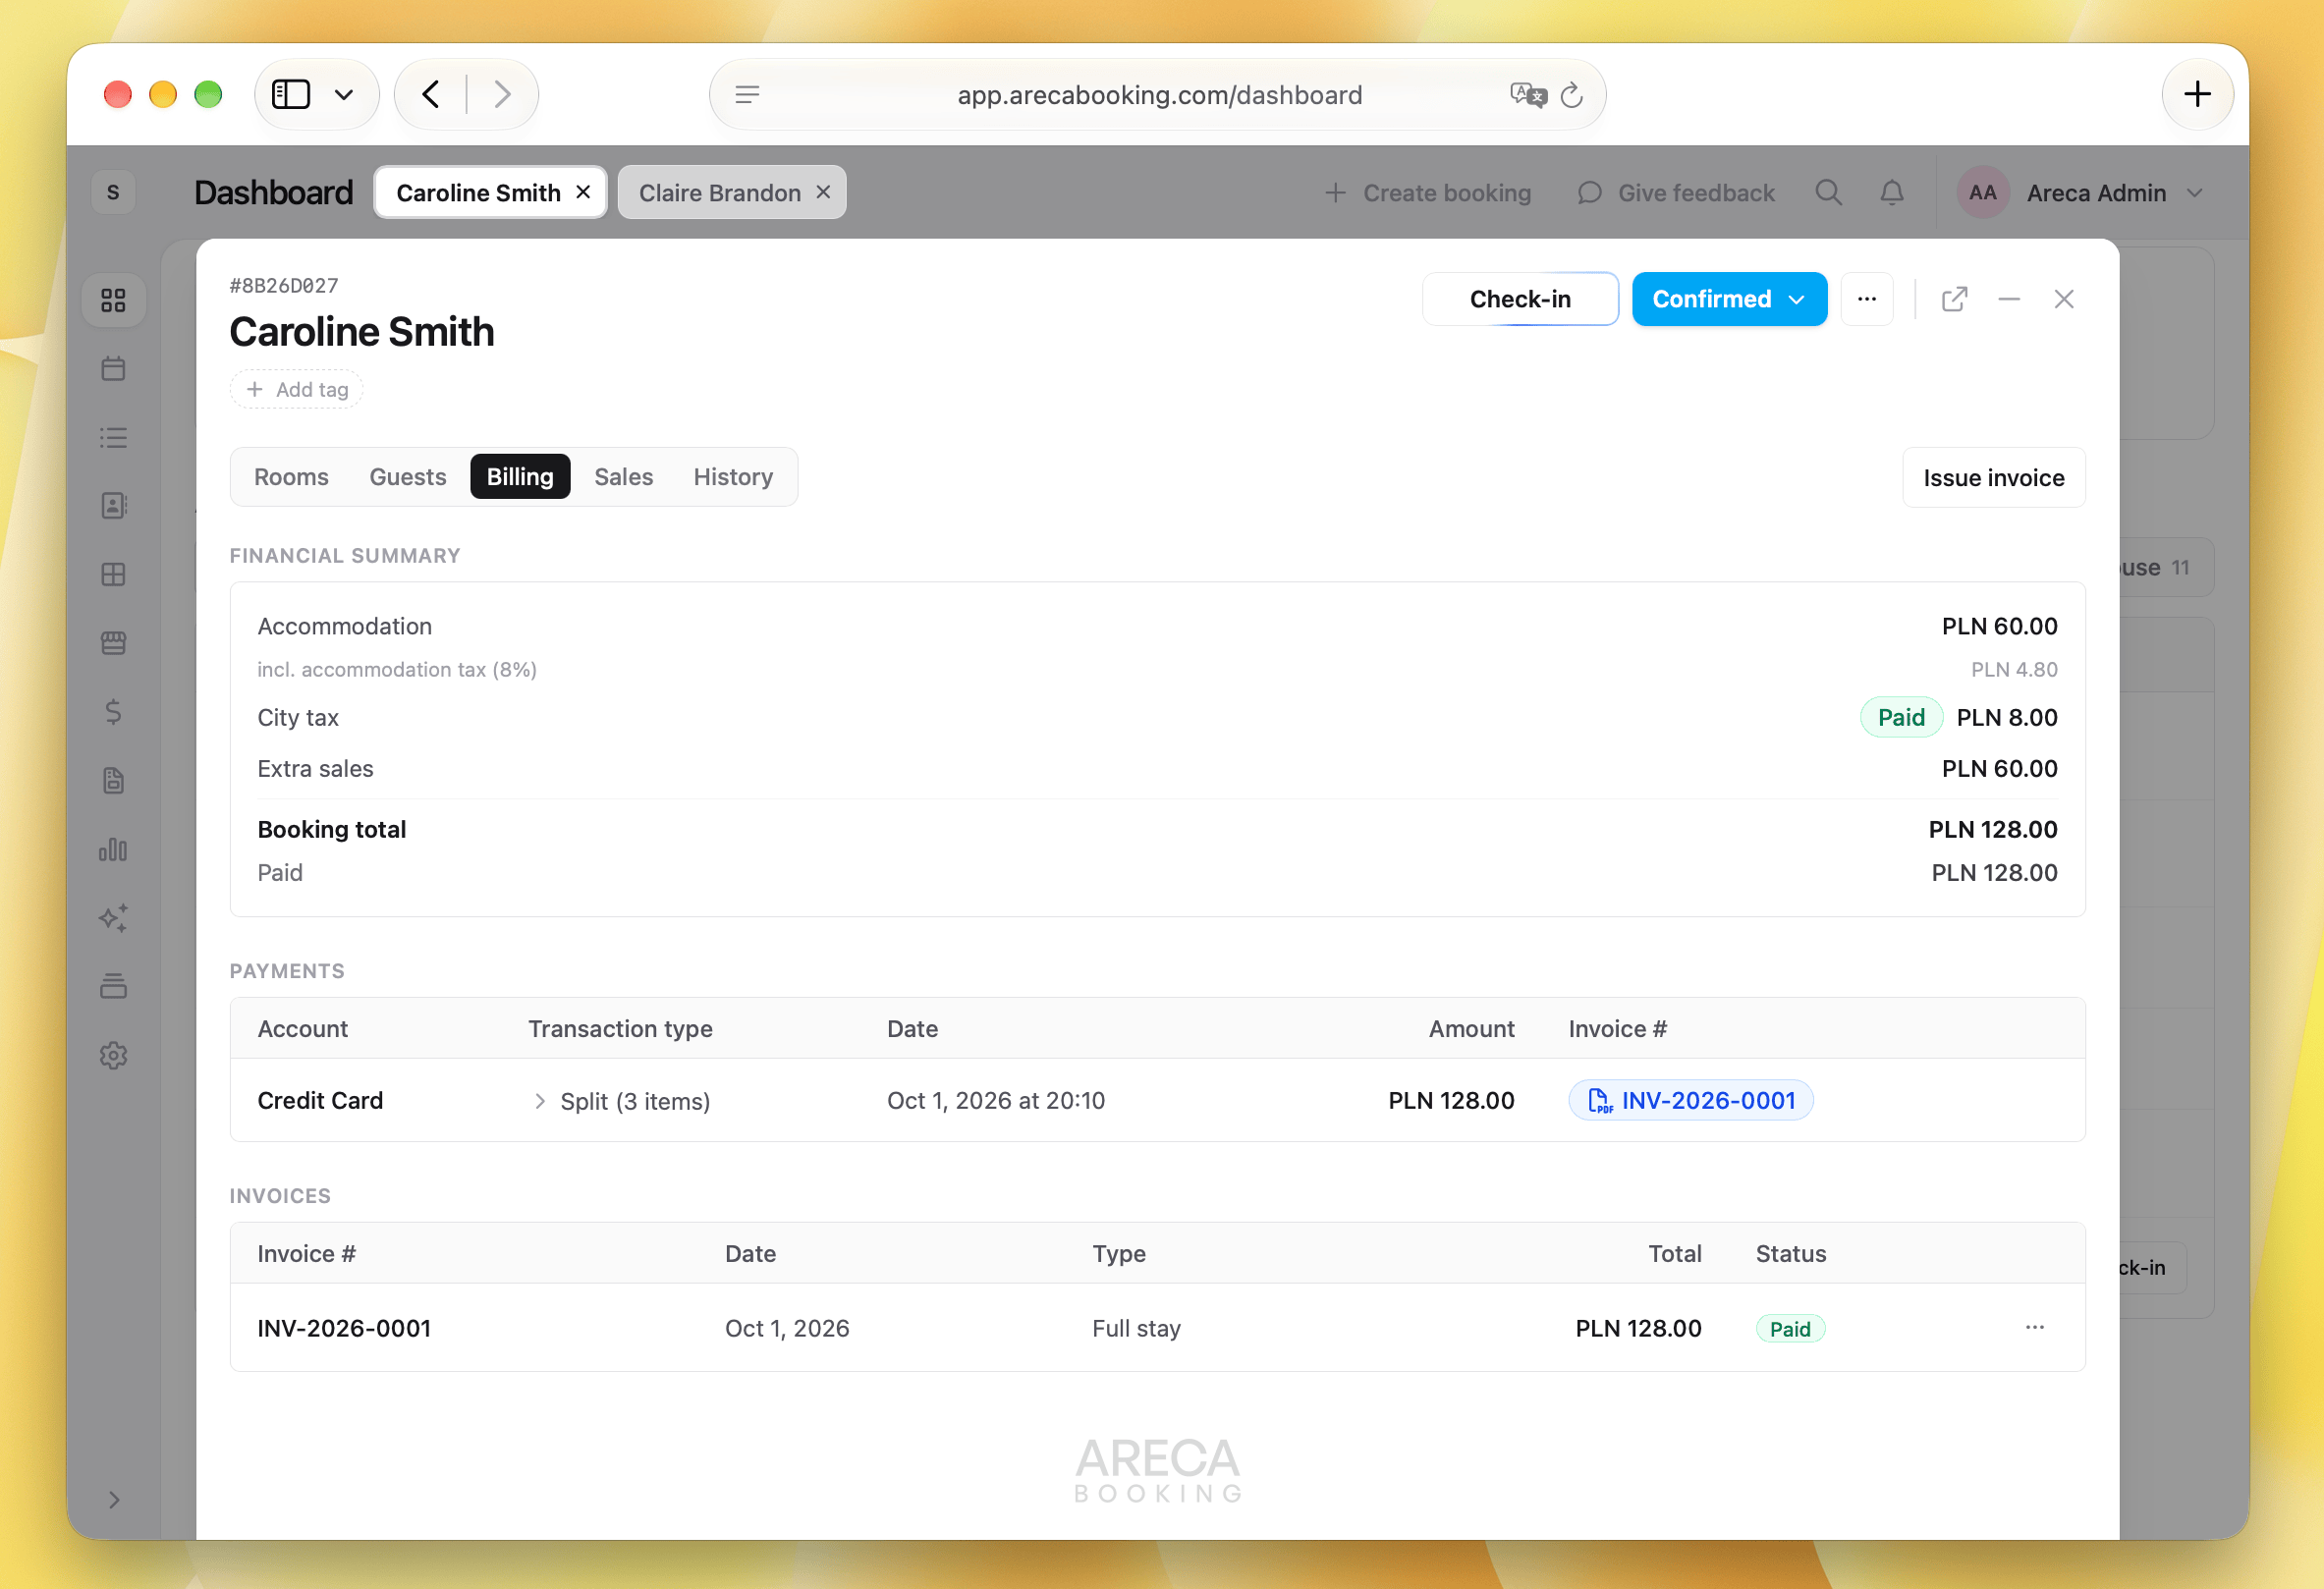
Let them do it three times with a test booking: add an item, take a partial payment, settle the rest. Repetition is what turns "I hope I did this right" into "done".
Check-out and passing information to the team (Minutes 25-30)
Focus: closing the stay and keeping colleagues informed.
- Check-out in one click. Once the balance is settled, the receptionist marks the guest as checked out. If there's still money owed, the system shows it before they finish, so nothing slips through.
- Adding a note. Show where to leave notes on a booking: "Requested extra pillows", "Arriving after midnight", "Left a charger in room 4". The next shift sees it immediately.
- Handing over to housekeeping. Today's departures and arrivals show which rooms need turning around first. If your housekeeping team has their own Housekeeping role in Areca, they see the same up-to-date information without access to anything financial.
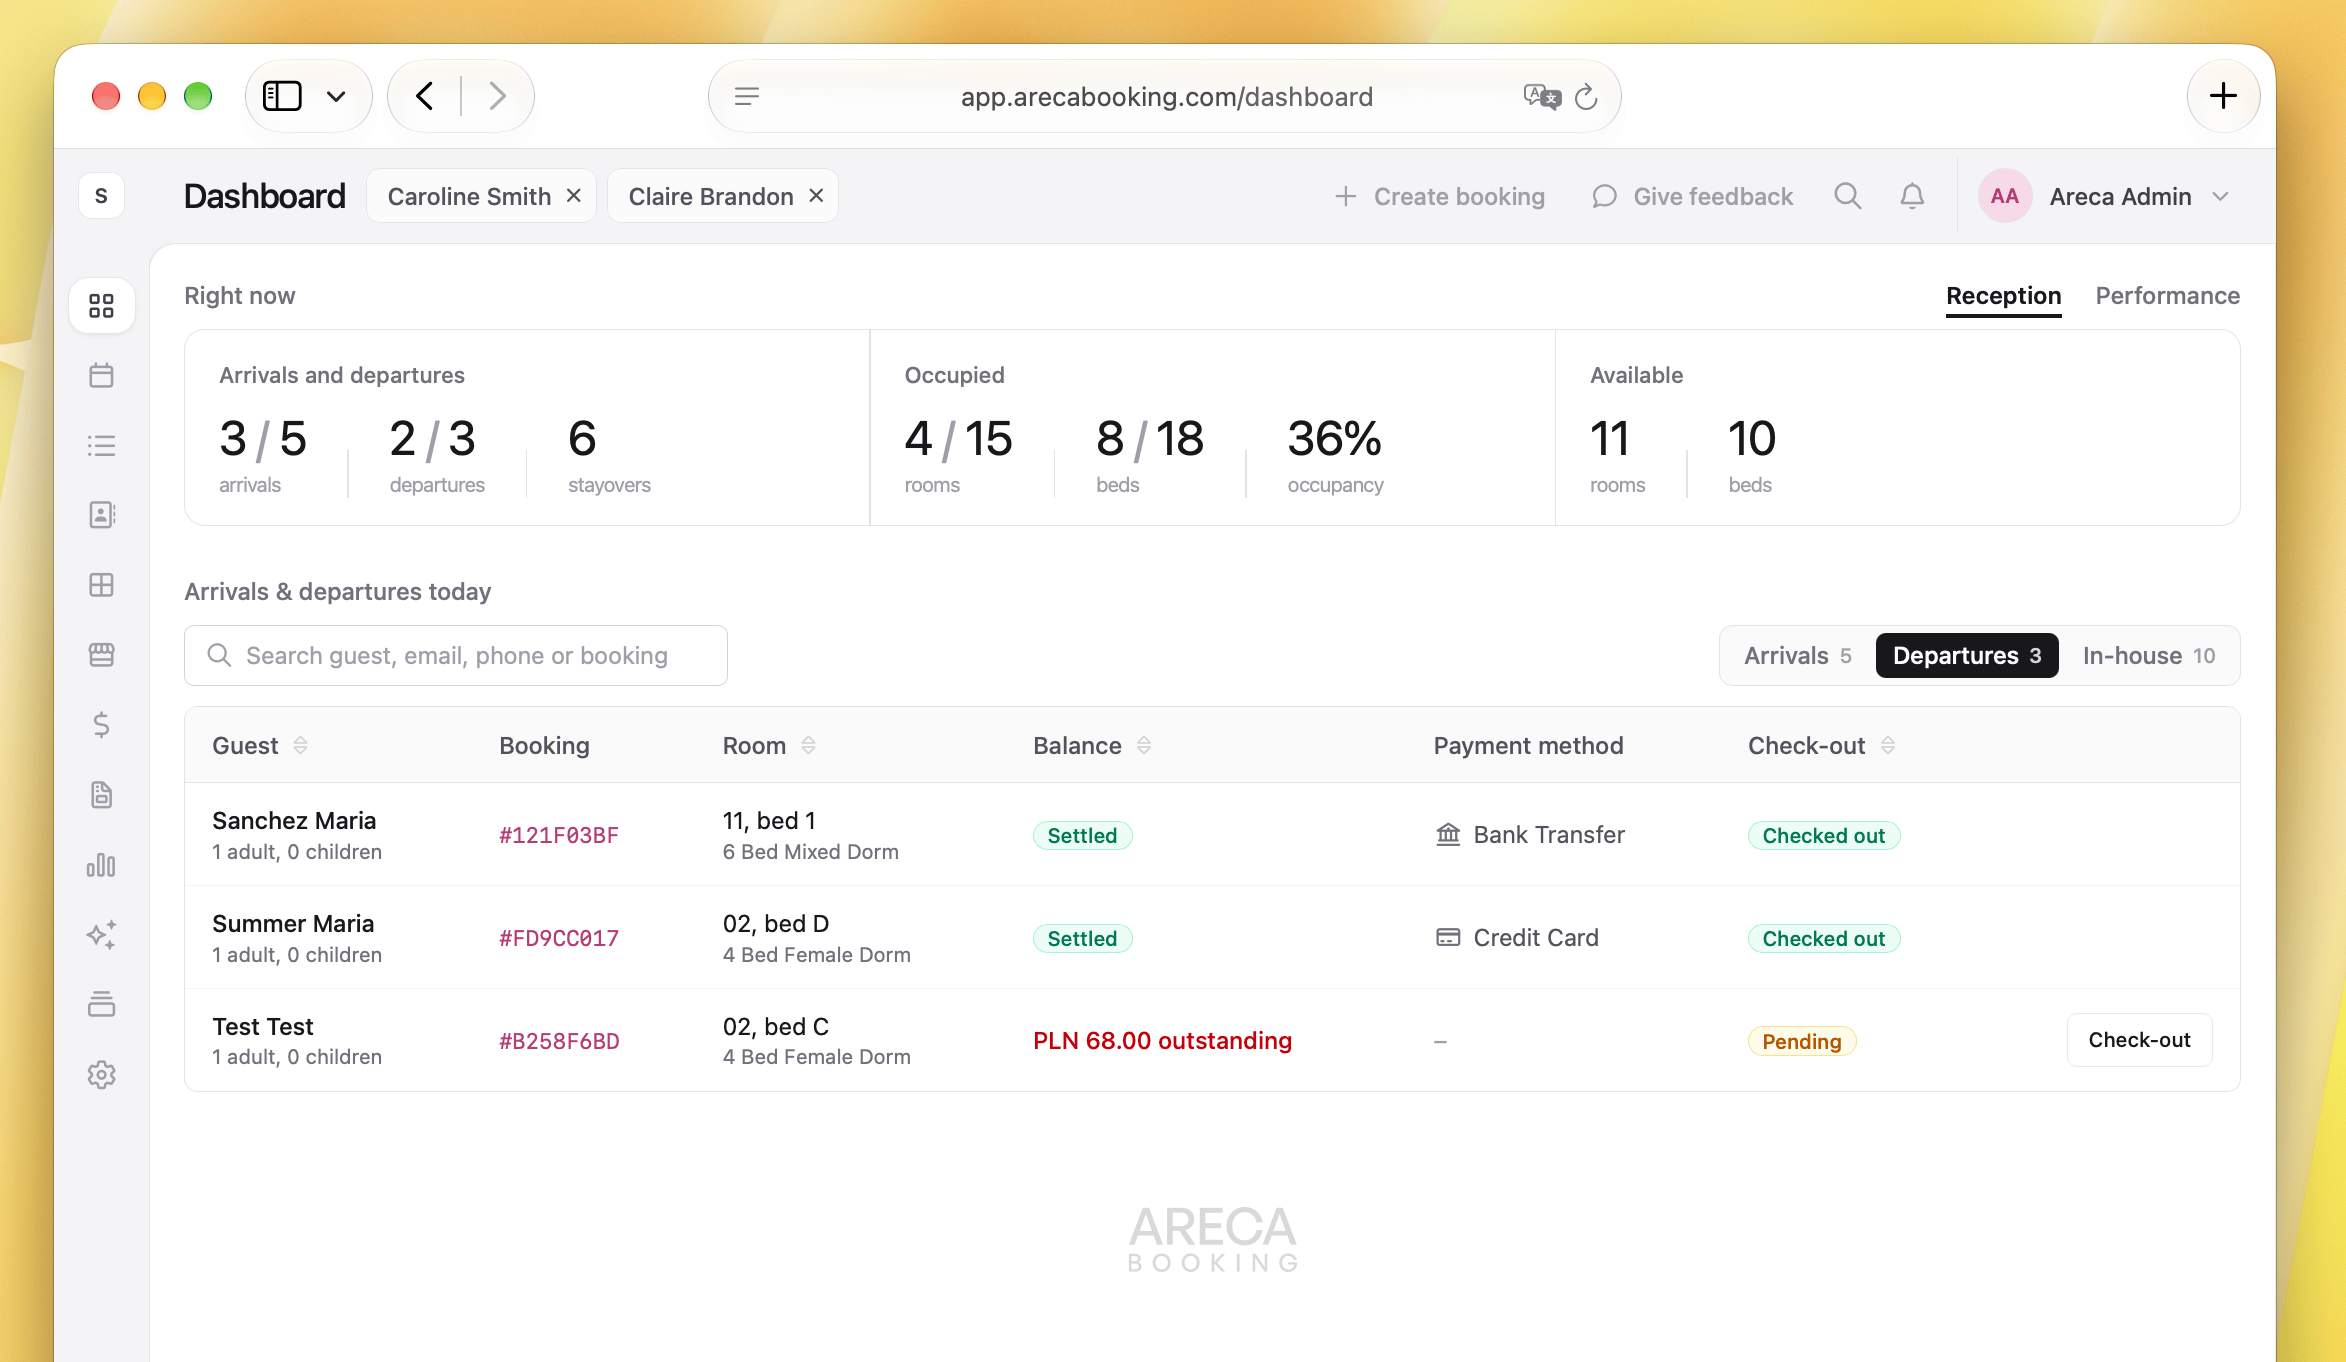
That's it. Thirty minutes, and your new hire can run a standard shift.
The 3 golden rules of receptionist onboarding
The framework above works best when you follow three rules while teaching it.
1. Train on real-life scenarios, not menus
Skip the tour of every tab. Don't say "This is the folio section". Say "A guest wants to buy a water bottle. Here's what you click". People remember stories and situations far better than screen names. Every scenario you practice becomes a memory they can call up mid-shift.
2. Teach recovery before perfection
The fastest way to build confidence is to show a new receptionist how to fix a mistake. Moved a booking to the wrong room? In Areca, press Ctrl+Z (or Cmd+Z on a Mac) on the calendar and the move is undone. Changed a status by accident? Change it back easily using right-click on the booking.
Once staff know they can't break anything permanently, they stop hesitating and start working.
3. Keep the cheat sheet visual and short
Print a single page and keep it next to the reception screen. Include:
- What each booking color on the calendar means
- Ctrl/Cmd+K for quick search
- How to minimize a booking to a tab
- The check-in and check-out steps
- Who to call for anything outside the Reception role
If your cheat sheet needs more than one page, take a hard look at your software before you blame your team.
Areca PMS lets you add quick general notes available in the Dashboard for easy reference.
Training should take minutes, not weeks
Front-desk onboarding shouldn't feel like earning an IT degree. When your PMS is fast, visual, and built for multi-tasking, the interface does most of the teaching. Your new receptionist spends their first shift looking after guests instead of fighting the screen, and when they eventually move on, replacing them is a 30-minute job instead of a two-week project.
High turnover will always be part of hospitality. Long training doesn't have to be.
Tired of clunky legacy systems that take 20 hours to teach? Try Areca PMS today, the fast, intuitive property management system built for modern teams.
Read next
Thinking about moving away from your current system? Our guide on 10 things to look for when switching your property management system covers what to test before you sign.
Once your new team is confident at the desk, 5 things your front desk should be upselling shows how to turn check-in into extra revenue.
And if your new hire runs into an unfamiliar term, keep our hospitality acronyms and terms glossary bookmarked.